Showing posts with label I'm Throwing a Backyard Party. Show all posts

Wednesday, August 21, 2013

Pasta Salad with Feta and Sun Dried Tomatoes

This is an absolutely delicious and easy pasta salad. My mom used to make it all the time, and I’ve never forgotten it. Actually it got me through the summer of 2003 when I was living on campus in a fraternity house. It goes well with keg beer.
Recipe
  • 1 package pasta (I like tortellini or orecchiette)
  • 1 jar sun dried tomatoes, julienne cut, drained
  • 1 package crumbled feta cheese
  • 1 ½ cups zesty Italian dressing
  • 1-2 tablespoons freshly chopped herbs (optional)
Cook the pasta, drain. Mix with dressing and tomatoes, and let cool for a bit.  Add plenty of S&P to taste.  Mix in the feta and chopped herbs (I used oregano), and refrigerate until ready to serve.

Friday, June 29, 2012

Sangria

We leave for Spain tomorrow! I am excited about the Spanish ham, paella, manchego, and of course, SANGRIA. I thought I would leave you with a recipe to get myself in the Spanish spirit and hopefully brighten up your weekend.
Recipe
  • 1 bottle of your favorite red wine (I used a Pinot Noir)
  • 3/4 cup Bacardi
  • 1/4 cup vodka
  • 2 tablespoons sugar
  • 1 lime, sliced
  • 1 orange, sliced
  • 1 apple, sliced
  • 1/2 cup blueberries
  • 1/2 cup pineapple 
Mix all ingredients in a pitcher of your choice, and chill for at least an hour to let the flavors marinate. Serve over ice with as little or as much fruit in there as you want. Drink responsibly. 
Ha.

Wednesday, June 13, 2012

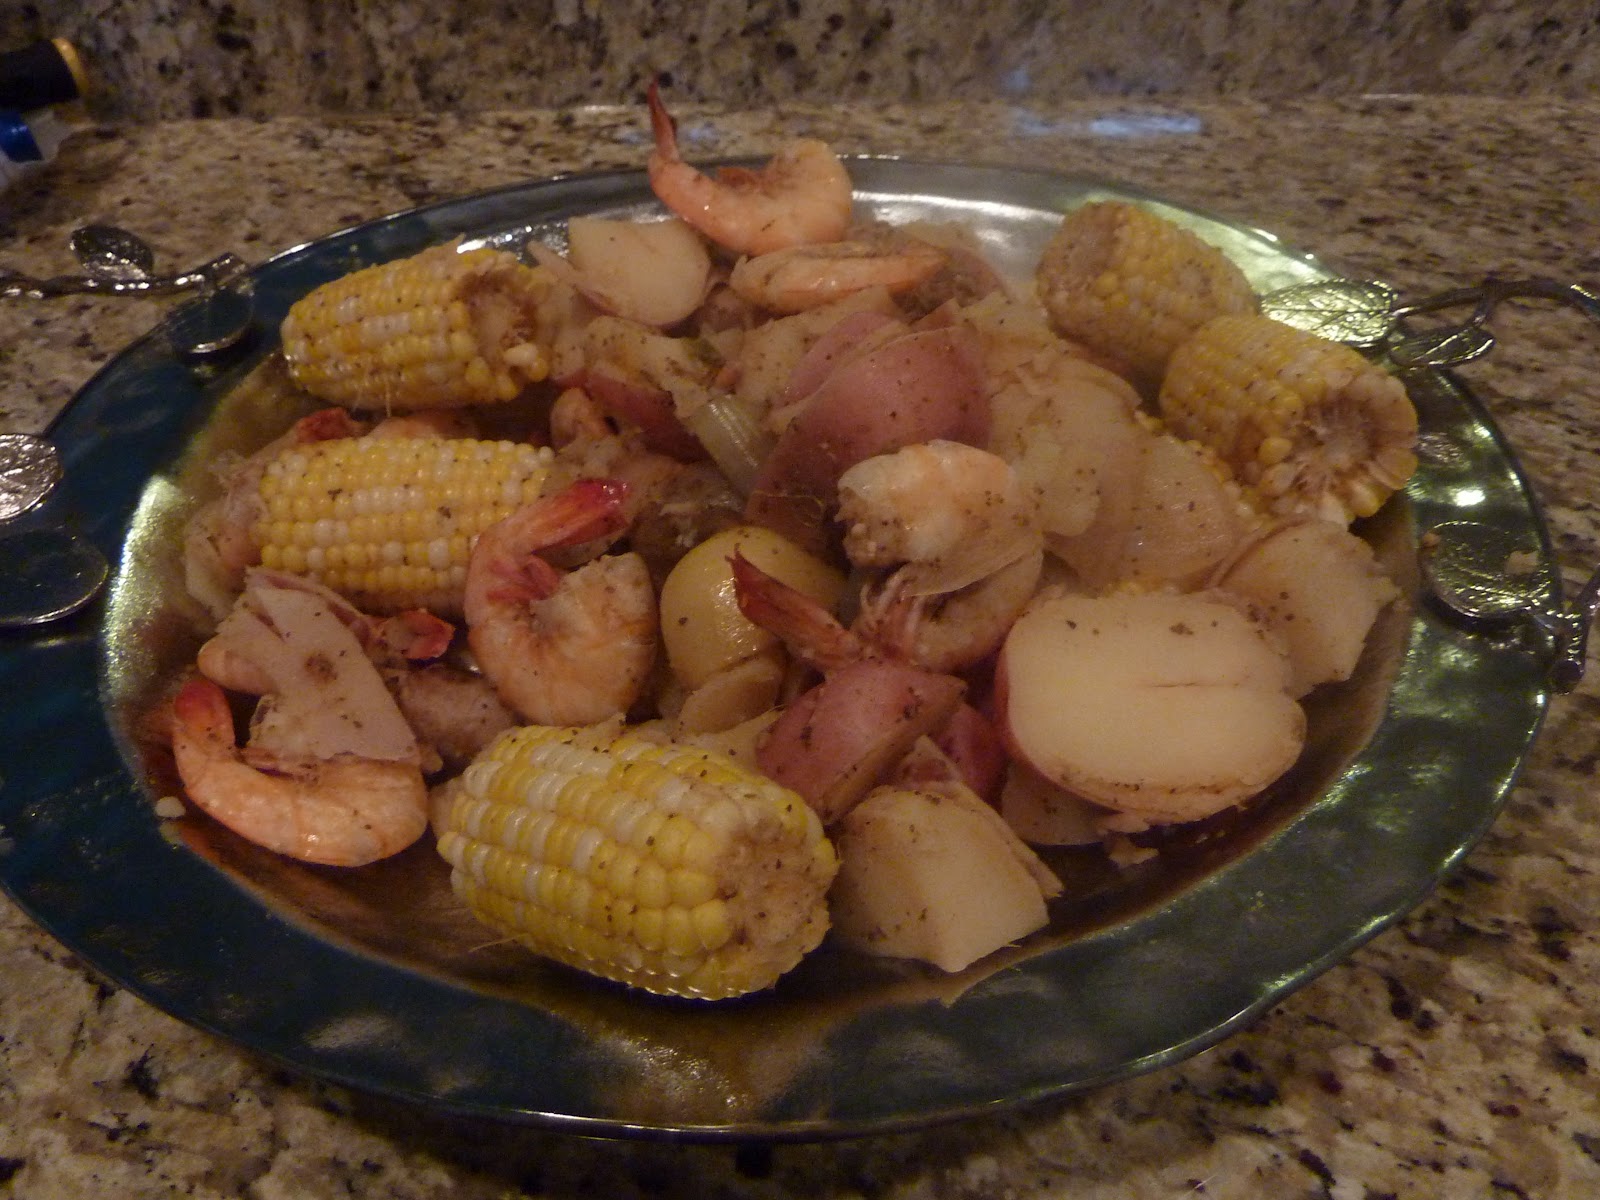
Shrimp Boil!

Shrimp Boil! The perfect summertime-dinner-outside-at the cabin meal! Unless of course you are in Texas and it is already 100 degrees so eating outside is no longer an option.

I can't explain my motivation for this one. Most Sunday mornings I wake up with BBQ ribs or fried chicken on my mind, but last Sunday was different. I wanted something lighter, something different, and something festive.  It was perfect for our two-person celebration. What we were celebrating, however, is in question. 

I did a lot of research on this recipe before I tried it - it is not hard at all, but I wanted to make sure I was aware of all the seasoning options out there.  I merged a number of recipes and added a bunch of herbs from our garden, and came up with one tasty shrimp boil.

Recipe
  • 1-2 tablespoons butter
  • 1 large onion
  • 4 quarts water
  • 1 can beer
  • 1 lemon
  • 1/2 cup Old Bay Seasoning
  • 1/2 teaspoons Cayenne Pepper
  • 2  tablespoons worcestershire
  • 5-6 sprigs fresh herbs
  • 1 lb large shrimp, shells and feet on
  • 1 lb kielbasa, cut in 4-inch pieces
  • 1-2 lbs red potatoes, halved
  • 4-6 ears corn, halved
  • cocktail sauce, for serving (optional)
Start by chopping the onion into large pieces, and cooking in butter (or olive oil), over medium heat, in a LARGE pot - about 5 minutes.  Pour in the beer, then the water. Cut the lemon in half, squeeze in all the juice, and throw both halves in the pot.  Mix in the seasonings and herbs. For the herbs I just grabbed a bunch from our garden - oregano, thyme, and basil.
 Bring to a low boil, cover and let steep for about 10 minutes.
Next, add the potatoes. Let boil for about 8 minutes. Add the corn, boil for 5 minutes. Add the sausage, boil for 5 minutes more. Finally, add the shrimp and boil for 3-5 minutes, until they kind of float to the top. My shrimp were huge so I boiled for the full 5 minutes.  Remove the pot from the heat, and drain all the liquid. Now, if I were in Northern Wisconsin eating this, I would probably cover a picnic table with a red and white tablecloth and dump it right on there for everyone to eat with their hands, but we're not. So I put ours in a bowl, and served with delicious crusty bread for dipping (you can reserve some of the sauce!), and our leftover cocktail sauce from here.

Enjoy!

Monday, June 4, 2012

My Potato Salad

Yes, I finally have my own potato salad recipe. Most people probably didn't know I was even searching for my own potato salad, but I was. It has been a long, treacherous road of brainstorming, cookbook reading, and Central Market sampling - but I made it. And the result is one darn good potato salad, that is now going to become 'Gretchen's Potato Salad' - though I don't know to whom.

I totally get why there are so many potato salad recipes out there. I like them all - mustard based, mayo based, with egg, with peppers - it turns out everything tastes good with potatoes. But what I did discover during my days of study was that I think simpler is better. There is no reason to add a bunch of crap to potato salad, and there is no reason to over-mayo it.  I also came to the conclusion that my favorite quality of potatoes is the ability to turn them into loaded baked potatoes. We loooove those. So, my potato salad variation tastes an awful lot like a loaded baked potato, with a little tang from the mustard, and a little sweetness from the mayo. YUM.

Recipe
  • 3-4 lbs red potatoes
  • 3/4 cup mayo
  • 1/4 cup sour cream
  • 1 heaping tablespoon dijon mustard
  • 1 heaping teaspoon yellow mustard
  • ~6-8 slices of bacon
  • 1 tablespoon bacon drippings
  • Chopped fresh chives
  • Chopped fresh parsley
Start by halving or fourthing (is that a word? Quartering might be more appropriate. Or accurate, rather) the potatoes, and boil them in a large pot until fork tender. Drain them and set them aside.

Cook the bacon until crisp, transfer it to a plate lined with a paper towel, and reserve 1 tablespoon of the bacon drippings. I think I am going to tell people this is the secret ingredient.

Mix the mayo, sour cream, bacon drippings, and both mustards in a bowl. Mix into the potatoes, and add plenty of salt and pepper. Chop the bacon, chives, and parsley (to taste), and throw it into the potato mixture. Chill for several hours before serving.

I also served this at our Memorial Day dinner party, along with this and this.

Friday, April 27, 2012

Grilled Kabobs (of every variety)

Oh Kabob, how I love you. Not just your ease of preparation, your versatility, and your tastiness, but for your name. Kabob. Kabob, kabob, kabob.

Last Sunday was a beautiful day, so we wanted to get out of the kitchen and grill something for dinner instead (note: I use the term 'we' lightly).  My husband is a huge fan of kabobs, and so we decided to make those. Plus, we got an amazing kabob platter from my sister Kirta and bro-in-law Matt, so I was very excited to use it. 
See that? Awesome.

As usual, we couldn't decide between steak, chicken, or shrimp. So also as usual, we decided on all three.  That's totally reasonable for two people. There's always leftovers, right?

The marinade for these turned out great, although I think it's pretty hard to screw up a kabob. 

Steak Kabob Marinade
  • 1/2 cup soy sauce
  • 1/4 cup olive oil
  • 4 dashes Worcestershire
  • 2 tablespoons brown sugar
Chicken & Shrimp Kabob Marinade
  • 1/2 cup soy sauce
  • 1/4 cup olive oil
  • 3 tablespoons balsamic vinegar
  • 2 tablespoons brown sugar
  • 1 tablespoon lime juice
I don't know that there was any particular reason that I chose to make two different marinades, but for some reason Worcestershire sounded great for the steak...but I wasn't sure about the chicken. Chop the chicken and/or steak into large pieces, and marinate for about 8 hours or overnight.   The vegetables should marinate for a couple of hours, and the shrimp should only marinate for about 30 minutes. Those guys really soak it up fast. 

For vegetables we chose the standards: red and yellow peppers, onions, mushrooms, pineapple (maybe not so standard, but deeeelicious), tomatoes, and red potatoes.

When your grill is nice and hot, thread the meat and vegetables onto the skewers (soak them first if they're wooden), and grill for about 5-7 minutes on each side. The shrimp will only take a minute or two.  I served these with Grilled Corn Patties and Popovers, because popovers should be eaten at every meal.
Enjoy these fun and tasty kabobs, and if you want to get really crazy, wrap them in bacon. Kabob.

Thursday, April 26, 2012

Grilled Corn Patties

I have a chronic case of writer's block. I know, it's true, I'm not really a writer. But I feel like most of my previous posts have come to me with ease, writing exactly what I'm thinking. Sometimes I was even funny, I thought.

Well, not anymore. Work has sucked the life out of me, and now you are all stuck with a lifeless, boring, blogger. I don't even feel like I'm truly categorized as a 'blogger,' so I'm really just a lifeless, boring girl who happens to have a cooking blog, sharing tasty recipes to you with no charm or wit. Please, ignore me but not the food. I know my intro has really tempted you to keep reading, but please do.  These grilled corn patties were soooo good, and a solution to a problem I have endured for quite some time: what other truly delicious side dishes exist that are not some form of potato??? Well, here they are. And they still conveniently include chives and sour cream.

Recipe
  • 2 cups frozen corn, thawed
  • 3/4 cup mozzarella
  • 1 cup breadcrumbs
  • 1/3 cup fresh chives
  • 1 tablespoon sour cream
  • Salt & Pepper
  • Olive Oil
Heat the grill to medium high.  Place the corn in the bowl of a food processor, and blend until semi-smooth - you still want plenty of full corn kernels in there. Transfer the corn to a bowl, and mix with the mozzarella, 1/2 cup of the breadcrumbs, chives, sour cream, S&P.  Form the corn mixture into patties, then place on a plate and refrigerate for about 20 minutes.
Next, coat the patties in the remaining breadcrumbs and drizzle with olive oil. Place them on a grill pan, or on a sheet of aluminum foil if you don't have that.
Grill the patties about 4-5 minutes on each side, and then serve with sour cream.
Can we say delicious and fun? I think so.

    Thursday, April 19, 2012

    Punch Bowl Mojitos

    To make sure you all have a good time this weekend....
      
    Recipe 
    • 4 750 mL Bacardi Light Rum (or about 1.5 of the big bottles)
    • 4 bunches mint leaves, washed and stemmed
    • 3 cups sugar
    • 5 cups fresh lime juice (or more to taste)
    • 3 bottles of club soda (or more if you're a wimp)
    • 3-4 limes, for garnish
    Place the mint leaves in a large ziploc bag, and add the sugar. Seal the bag, then roll a wooden rolling pin (or something similar...my generation has devalued the importance of the rolling pin)..... over the mint and sugar mixture for about 30 seconds to bruise the leaves. Pour the mixture into a punch bowl (or large pitcher if you're making a smaller batch). Next, add the lime juice. Lucky for me I discovered that Central Market sells fresh lime juice by the quart, right after I had a mini-meltdown when I juiced about 30 limes by hand and it yielded about 1 cup of juice. I've always wondered why people buy juicers. Now I know.

    Finally, pour in the rum and club soda, mix thoroughly and top with plenty of freshly sliced limes. Serve over ice in the backyard with Jimmy Buffett blasting on your iPod.

    Tuesday, April 17, 2012

    Watermelon Avocado Salad with Basil and Mint

    I've already posted a recipe similar to this, but this time I added basil and mint. And woah...the unexpected flavor combination goes perfectly together. I also used a different salad dressing, but you can just use balsamic vinaigrette if that's easier for you.

    Recipe
    • 1 seedless watermelon, chopped
    • 3-4 ripe but firm avocados
    • 1 bunch mint, stemmed and chopped
    • 1 bunch basil, stemmed and chopped
    • 1-2 cups spinach (optional)
    • 1 package shaved or crumbled feta
    • 3 T red wine vinegar
    • 2 T balsamic vinegar
    • 1/4 cup olive oil
    • 2 teaspoons sugar
    Mix the first six ingredients in a large bowl.  Combine the dressing ingredients separately and then pour over the salad and toss to distribute evenly. 

    Saturday, January 28, 2012

    Campfire Margaritas

    If you have never made campfire margaritas, do it now. I don't care if you are reading this at 9AM on a Monday - make these immediately. 

    John and I made these last Friday for a mini personal happy hour before we headed to dinner. They are so refreshing, tasty, and healthier than your standard margarita made from a mix. Plus it was an excuse to drink out of those glasses with cactus stems.

    Here's what you need:

    And if you don't have an adorable little Italian - looking pitcher that your mom gave you as a wedding shower gift, any pitcher will do.

    Recipe
    • 1 can limeade
    • 1 can tequila
    • 1 can diet 7up or Sprite
    • 1 Corona Light
    • Fresh lime (optional)
    Pour the limeade into the pitcher, then fill up that can with tequila and then diet 7up, mixing both into the limeade. Pour in the Corona, and squeeze in some fresh lime juice if you have it. 

    You can serve these on the rocks (that's what we did), or blend in a bunch of ice and serve them frozen. 

    These aren't really a winter recipe I suppose...but there is never a bad time for a margarita. Drink up!


    Thursday, December 22, 2011

    BBQ Chicken Pizza

    It used to be hard for me to understand BBQ Chicken Pizza people. Why in the world would one choose to order that over your standard, delicious, amazing, traditional tomato sauce pizza? You know the old saying - if it ain't broke don't fix it. I think whoever came up with that had pizza in mind.

    Well, I've turned a new leaf. I moved into a new neighborhood, started going to new restaurants, and started doing new things. Marriage being one of them, BBQ pizza being the other. One of our favorite neighborhood restaurants has BBQ chicken pizza on the menu - and I don't know if it was newlywed bliss, severe starvation, or one too many glasses of wine - but I ordered it a few months ago. And I loved it. And I've been eating it nearly every weekend since.

    And, to get to the point, I wanted to make it at home. The key(s) to good BBQ chicken pizza - crispy crust, tender pulled chicken, good BBQ sauce.

    Recipe

    Pizza Dough
    1 cup warm water
    1 package yeast
    1 tsp sugar
    1 cup bread flour
    2 cups all-purpose flour
    1/2 teaspoon kosher salt
    1 tablespoon honey
    1 tablespoon olive oil
    Pizza
    2 skinless chicken breasts, bone-in
    1/2 onion, sliced
    BBQ sauce
    corn
    Fresh Mozzarella

    Start by mixing the pizza dough. In a liquid measuring cup, mix one cup of warm water, yeast, and sugar. Let it stand there for a few minutes to get all foamy. 

    In a mixing bowl, combine the flours and salt. Pour in the warm water and mix. Add the honey and oil. Knead together until combined. If the dough is too sticky, add a bit more flour. Cover the bowl and let rise for about an hour and a half. 

    Now, cook the chicken. There is a lot of flexibility here - you can use leftover chicken, grilled chicken, plain baked boneless skinless chicken...but I recommend this method if you have the time.

    Preheat the oven to 300. Heat 1-2 tablespoons olive oil in a dutch oven over medium-high heat. Add the chicken breasts, browning all sides.
    Throw in the sliced onions.
    Drizzle with some BBQ sauce (a cup or so) and a little more olive oil.
    Cover the pot and place in the oven. Bake for an hour and a half, and remove from the oven.

    Now it should be time to roll out the dough. Increase the oven temp to 450. My wonderful and thoughtful husband surprised me with a really great pizza stone - which works wonders on a pizza crust. I highly recommend you get one. If you don't have one, a baking sheet will be fine. Place the pizza stone/baking sheet in the hot oven to heat it up.

    Roll out the dough to your desired thickness. We like really thin, crispy, crust - I rolled out to about 1/4 inch thickness. Brush the top with olive oil and sprinkles with a little salt.

    Take the pizza stone from the oven, and drizzle with olive oil and flour. Use a brush to spread out evenly over the stone. This is a little hard to do without burning your hands, but you'll find a way.
    Place the pizza dough in the oven and bake for 8 minutes. Meanwhile, pull apart the chicken. It should just fall off the bone.
    Remove the pizza crust from the oven....
    Spread with BBQ sauce....
    Add the chicken...
    And plenty of fresh sliced mozzarella.  On half of the pizza I threw on some corn. Sadly, it was canned. Texas has bad corn. This is a great addition though and highly recommended.

    Bake the pizza at 450 for about 10-12 minutes, until the crust looks crisp and the cheese is slightly browned.  And that's all, folks!

    Wednesday, August 17, 2011

    Grilled Sausage and Red Pepper Pizza

    Whenever I suggest making homemade pizza for dinner, my fiance says 'there are just some things that are better at a restaurant.'  I always give in because he does have a point, why make something yourself when someone else has already mastered it to perfection? I could eat Louie's pizza in Dallas everyday of my life. Louie makes a mean pizza. 

    However, there are several reasons to make your own pizza. 1. It's fun to make 2. You can customize it (i.e., lighter on the cheese!!) 3. It truly is delicious!!!

    I bit the bullet this weekend and made this pizza recipe (without telling my fiance about it ahead of time) - and I turned him into a believer. It was wonderful, maybe not Louie's wonderful, but homemade wonderful - which can be just as good. I like grilling the toppings and crust, then finishing it in the oven. Why grill the pizza at all? Because it tastes more like the brick oven (or woodfire, etc) pizza that restaurants seem so eager to advertise. They must know what they're doing, so I will follow their lead.

    Crust Recipe:
    • 3 1/2 to 4 cups bread flour (bread flour is key for a crispier crust; all-purpose makes it chewier)
    • 1 package instant yeast
    • 1 teaspoon sugar
    • 2 teaspoons kosher salt
    • 1 1/2 cups warm water
    • 2 tablespoons olive oil
    Combine the bread flour, yeast, sugar, and salt in the bowl of a standing mixer. Add the warm water and oil; mix until combined. Take the dough out and place on a lightly floured surface. Gently knead to form a ball; if dough is too sticky add a pinch more flour; if it is too dry you can add more water. Place the dough back into the bowl and set in a warm place in the house (75 degrees is good). Let rise until the ball doubles in size, about 1 hr.  This is my dough, enjoying an afternoon in my favorite room by the knockout roses. 
    While the dough is rising, prepare the toppings.  

    Pizza Toppings (for one large pizza):
    • 1/2 lb mild italian sausage (if you are in Dallas, Central Market has the best!)
    • 1 red bell pepper
    • 1 sweet onion
    • Chopped basil
    • 1/2 to 3/4 cup pizza sauce
    • Mozzarella to taste
    • Olive oil
    In a saute pan over medium heat, brown the sausage and drain. Heat the grill to medium heat. Chop the pepper and onion into large pieces, toss with olive oil and S+P, and lay directly on the grill. Grill until slightly browned, about 4 minutes on each side. Remove from grill and chop into smaller pieces, about 1/2 inch wide. Heat the grill to high.

    When the dough has risen, take it out of the bowl and place it on a floured surface. With a floured rolling pin, roll the dough until it is about 1/4-1/2 inch thick. I like really thin, crispy pizza, so the thinner the better. It helps to roll it out, let it rest for a second, then roll again. This process gives you the thinnest crust.
    Meanwhile, heat the oven to 450. Brush one side of the crust with olive oil. Place it on a floured pizza stone or pizza pan to take out to the grill. I find the best technique to move it onto the grill is to just pick it up with both hands and throw it on there, oil side down. Sure you lose a little of the shape here, but if you're not Bobbie Flay it is tricky to do it any other way.
    I didn't take a picture here because I was too concerned about burning the crust (or my fingers) - but I left the pizza on the grill for about 2-3 minutes, until crispy brown on the side.

    From here, you can either flip and finish on the grill, or move to the oven. It's easier to finish in the oven, so that's what I did. Slide the pizza dough back onto the pizza pan (using tongs), and bring inside for your toppings.

    Brush the top of the crust with olive oil (this keeps the sauce and toppings from sogging up the pizza). Add the pizza sauce, cheese, and desired toppings. I chopped up about a quarter cup of basil to add some flavor, and it was delicious. Place the pizza in the oven and cook for about 10-12 minutes, or until the cheese is slightly browned.
    This is a fun dinner party pizza, served with salad and plenty of wine!

    Friday, August 5, 2011

    Grilled Corn Guacamole

    If you are a guacamole lover (and who isn't), and you are looking to spice up your current recipe - this is a great option. The addition of grilled corn provides a very nice and flavor and texture to the standard guac recipe.

    Recipe
    2 ears corn
    3 avocados
    1 small tomato, diced
    1/4 teaspoon cumin
    Juice from 1/2 lime
    Pinch minced garlic
    Dash Onion powder
    Dash tabasco sauce
    1/4 cup chopped cilantro leaves
    Salt + Pepper

    Peel the husks back on the corn and remove the silk. Pull husks back over the corn and soak in water, about 20 min. Heat the grill, and cook the corn until slightly charred, about 15 minutes. Make sure you continuously turn them to cook evenly.  Let the corn cool, then shave off the kernels.
    Next, prepare the guacamole. Smash the avacadoes in a bowl, then mix in the remaining ingredients. Mix in the corn.  Place the pit of the avocado into the guacamole to preserve the color and freshness.

    Sunday, May 8, 2011

    Grilled Vegetable Salad

    This is a perfect summer salad that can be served with anything. It is a grilled salad, so I typically make it with grilled steak or fish. 


    Recipe:


    1 red bell pepper
    1 yellow bell pepper
    1 bunch asparagus
    1 onion
    1 box cherub tomatoes
    1 lb mushrooms
    Large bunch fresh basil
    1 / 2 - 1 cup crumbled feta or mozzarella cheese
    Balsamic Vinegar and Olive Oil


    Chop all vegetables into large pieces while you heat the grill. Drizzle with Olive Oil. Over medium heat, grill all the vegetables except tomatoes for approximately 10 minutes.  Turn vegetables over and add tomatoes; grill for another 2-3 minutes.


    I choose to place the vegetables directly on the grill rack because I like the marks it makes on the vegetables. For easier clean up, you could use a grill pan or aluminum foil. You want the vegetables to retain a little crispiness so be careful not to over cook.  Remove the vegetables from the grill and let cook for a few minutes. In a separate bowl, mix 1 tablespoon olive oil with 3 tablespoons balsamic vinegar. Pour over vegetables and add fresh basil to taste. I use a lot. Toss with cheese and serve.

    This picture is shown with mozzarella, but I prefer feta. Somebody (I won't mention any names), decided the fresh feta I bought last week no longer belonged in the refrigerator and tossed it. The mozz was great but feta adds a little extra flavor.